
Cloudy Headlights: What Causes Them & How to Fix Them
Clear headlights provide visibility for you and everyone else on the road. Cloudy headlights? They increase the risk of driving at night more than most people realize.
The average vehicle on Madison WI roads is about 10 years old. The older a car gets, the more likely hazy headlights become a problem. And this isn't just a beater-car issue – we see foggy headlight lenses on Lexus, BMW, and Mercedes just as often as Hondas and Fords. Headlight discoloration doesn't care what you paid for your vehicle.
What Causes Car Headlights to Get Cloudy?
Age and environment take a toll on headlights, especially the polycarbonate lenses that cover the bulb assembly. They get cloudy, yellow, and hazy-looking over time. There's no single element that causes the problem, but several factors work together.
UV Oxidation
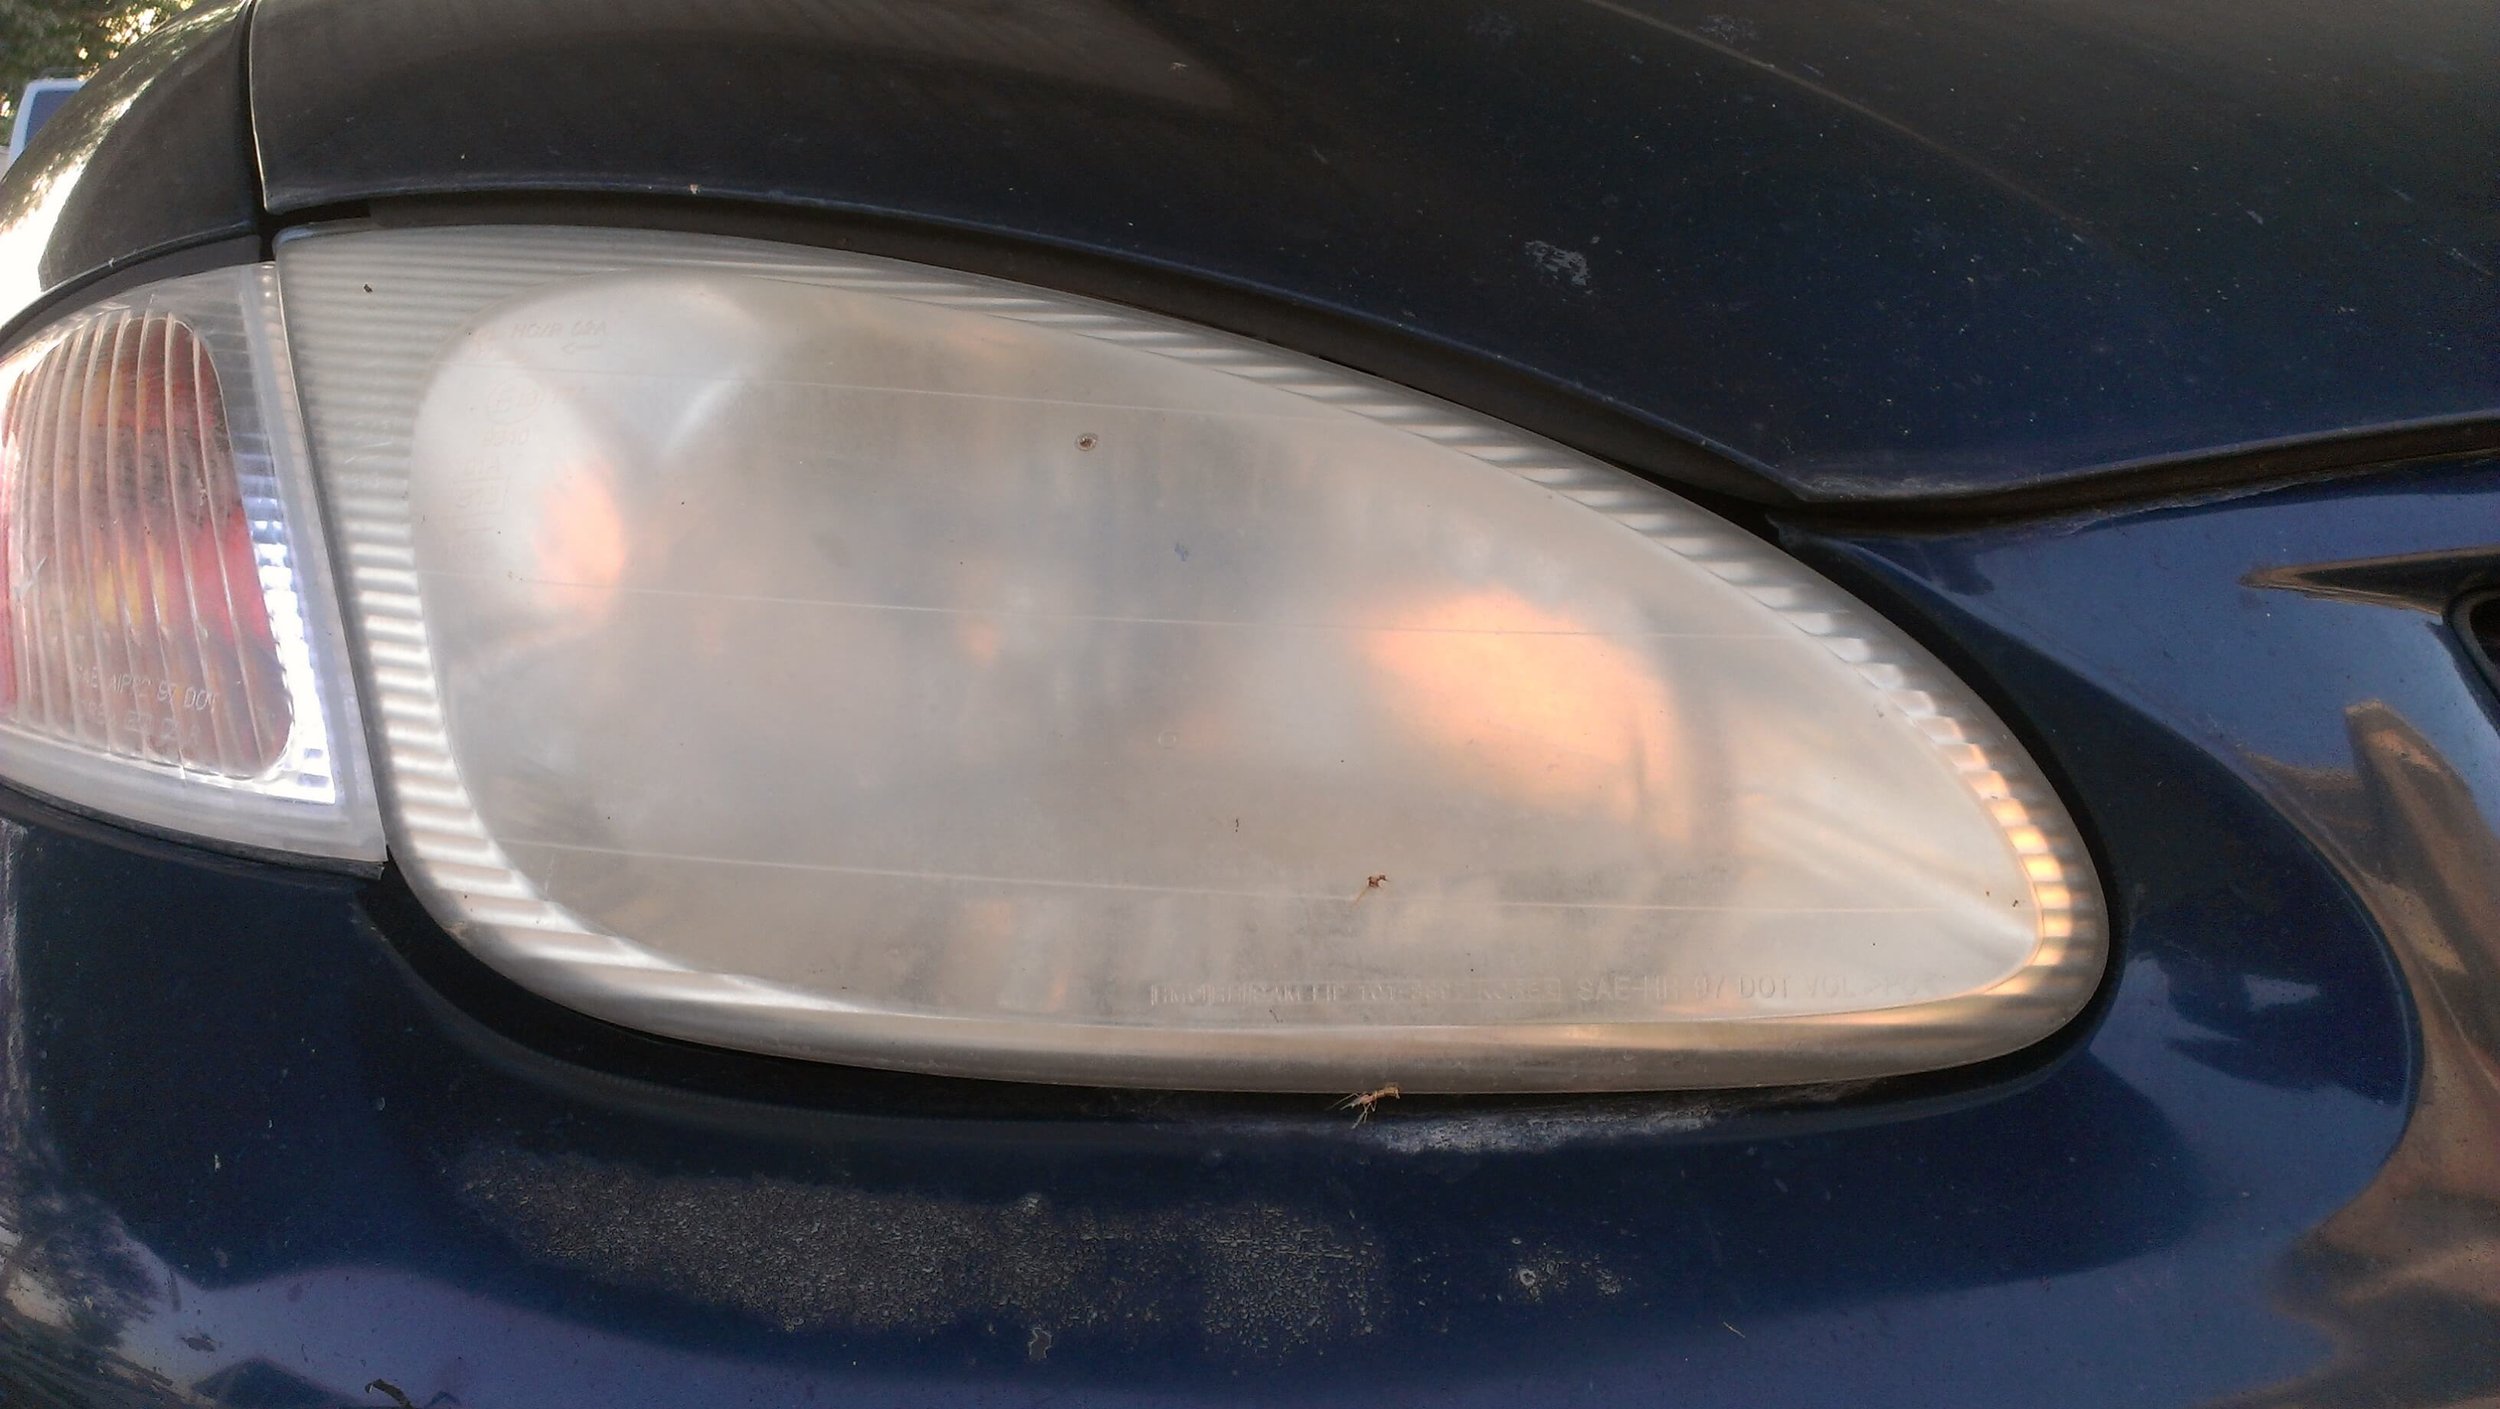
This is the big one. Headlight lenses come from the manufacturer with a hard topcoat designed to protect them as long as possible. Over time – usually three to five years – that top layer wears away, exposing the acrylic lens to air and UV radiation.
The sun's ultraviolet rays literally change the chemistry of the plastic, turning it yellow or yellowish-brown. Park your car facing south in a Middleton driveway for a few years and you'll see it happen. The side facing the sun gets cloudy while the other side stays relatively clear. We see this asymmetric yellowing constantly.
Physical Damage
The front of your vehicle takes the brunt of everything the road throws at it. Rocks, gravel chips, sand, cement fragments – it all hits your headlights at highway speed. Even tiny nicks and chips in the plastic open up the once-smooth surface to further degradation.
Each little impact becomes an entry point for moisture and chemicals. Over time, what started as invisible micro-damage becomes visible hazing across the lens surface.
Road Chemicals and Salt
Wet roads, especially during Wisconsin winters, coat headlights with mud, salt, and chemical film. Road treatments create an opaque layer that reduces light passing through the lens.
On an already-damaged surface, these chemicals actually bond with the plastic and form a permanent hazy layer. Regular washing removes surface grime, but once chemicals have reacted with compromised plastic, washing alone won't fix it.
Condensation Inside the Housing
Water vapor inside the headlight assembly condenses and forms a film on the inside of the lens. This happens when the outer seal breaks down and moisture enters the housing.
When you see water droplets or fogging inside your headlight, that's condensation scattering light from the bulbs and cutting your visibility. This is different from external clouding and requires a different fix – usually resealing or replacing the headlight assembly.
Do Foggy Headlights Reduce Visibility?
Absolutely. And the numbers are worse than you'd think.
Dirty headlights can reduce visibility by up to 80% compared to clean, clear lenses. That's not a typo. Studies from AAA and the Insurance Institute for Highway Safety have shown that heavily oxidized headlights produce dramatically less usable light output than clean ones.
Think about what that means in practical terms. You're driving home on Highway 12 near Waunakee on a rainy November evening. With clear headlights, you might see 300 feet ahead. With severely clouded lenses? Maybe 60 feet. At 55 mph, you're covering about 80 feet per second.
The math gets scary fast.
And it's not just about your own visibility. Cloudy headlights also make your vehicle less visible to oncoming drivers, pedestrians, and cyclists. The light output is dimmer and more diffused, which means other people see you later than they should.
Here's something else most folks don't consider – hazy headlights change the light pattern. Instead of a focused beam illuminating the road ahead, light scatters in all directions. This actually creates more glare for oncoming traffic while giving you less usable light. Worst of both worlds.
Why Do Headlights Get Cloudy? The Timeline
People ask us this all the time: why do car headlights get cloudy when they used to stay clear forever?
The answer is materials. Older vehicles had glass headlight lenses. Glass doesn't oxidize or yellow. It stayed clear indefinitely. The downside? Glass was heavy, expensive, limited design options, and when it broke it shattered into dangerous shards.
Manufacturers switched to polycarbonate plastic lenses starting in the late 1980s. Polycarbonate is lighter, tougher, cheaper to produce, and allows the complex lens shapes you see on modern vehicles. It also doesn't shatter on impact.
The tradeoff is UV sensitivity. Polycarbonate degrades when exposed to ultraviolet light. Manufacturers apply a UV-protective coating at the factory, but that coating has a finite lifespan.
Here's a rough timeline for headlight degradation in the Madison area:
Years 1-3: Factory coating holds up well. Headlights stay clear with normal washing.
Years 3-5: Coating starts wearing thin. Slight yellowing might be visible in direct sunlight. Still functional.
Years 5-8: Noticeable yellowing and hazing. Light output drops measurably. This is where most people start noticing their headlights look bad.
Years 8-12: Significant clouding. Headlights look rough and light output is substantially reduced. Restoration or replacement needed.
12+ years: Severe oxidation, possible cracking, heavy discoloration. May be beyond restoration depending on damage depth.
Wisconsin's climate accelerates this timeline compared to southern states. The combination of intense summer UV, winter road chemicals, and temperature swings from -20°F to 90°F stresses the plastic and coating more than moderate climates.
How to Prevent Headlights From Getting Cloudy
Prevention is always cheaper than repair. Here's what actually works:
Park in shade or a garage when possible: UV exposure is the primary cause of headlight discoloration. Reducing sun exposure slows the degradation process significantly. Even parking facing north instead of south makes a difference over time.
Regular washing: Keep road chemicals, salt, and grime off your headlights. These contaminants accelerate the breakdown of the UV coating. During winter months around Sun Prairie and Madison, salt builds up fast – wash it off at least every two weeks.
Apply UV protectant: After cleaning, applying a UV protectant spray designed for automotive plastics adds a layer of protection. It's like sunscreen for your headlights. Reapply every few months.
Wax your headlights: When you're waxing the car, hit the headlights too. A thin layer of quality wax provides UV protection and makes the surface slick so contaminants don't stick as easily.
Don't use harsh chemicals: Avoid household cleaners, degreasers, or solvents on headlight lenses. They strip the UV coating faster.
Address chips immediately: If a rock chips your headlight lens, clean the area and apply clear coat or a UV protectant to seal the exposed plastic before oxidation starts.
None of these methods stop the process entirely. They slow it down. Eventually every polycarbonate headlight needs restoration or replacement. But prevention can buy you several extra years of clear lenses.
How to Fix Hazy Headlights: DIY Options
There are plenty of do-it-yourself headlight cleaning methods out there. They have varying levels of effectiveness and longevity. Here's an honest assessment of the common approaches:
The Toothpaste Method
Applying toothpaste to discolored lenses actually does work – to a degree. The mild abrasive in toothpaste buffs away some of the oxidized surface layer. Follow up with a coat of good car wax for protection.
The catch? The improvement lasts maybe two months before the cloudiness returns. You're removing a thin layer of damaged plastic but not replacing the UV protection, so the exposed surface starts oxidizing again almost immediately.
Good for: Temporary improvement before selling a vehicle or passing inspection. Not a long-term fix.
Sandpaper Method
Sounds harsh, but wet-sanding with fine-grit sandpaper (1000 through 3000 grit, progressively) actually removes the damaged layer of plastic effectively. It's the most thorough DIY approach.
The process smooths out minor cracks, chips, and oxidation that diffuse the light. But – and this is important – you absolutely must apply several layers of UV-resistant clear coat afterward to protect the freshly exposed plastic.
Without clear coat, the sanded surface will cloud up faster than the original because you've removed every bit of UV protection. We've seen people sand their headlights beautifully, skip the clear coat step, and have worse headlights within three months than when they started.
DIY Restoration Kits
Auto parts stores sell headlight restoration kits ranging from $10 to $50. Most include some combination of sandpaper, polishing compound, and a coating solution.
Results vary wildly by brand and application technique. Some work reasonably well. Others are basically fancy toothpaste in a different package. The coating solutions included in cheaper kits tend to be thin and wear off quickly.
The fundamental problem with most DIY approaches: they remove the damaged surface but don't replace the UV protection with anything that lasts. Professional-grade UV coatings cure differently and bond more permanently than anything in a consumer kit.
How to Restore Headlights: The Professional Approach
Professional headlight restoration follows a systematic process that addresses all layers of the problem:
Assessment – We check how deep the damage goes. Surface oxidation? Easy fix. Deep yellowing into the plastic? More aggressive approach needed. Internal condensation? Might need the housing resealed or replaced entirely.
Thorough cleaning – Remove all surface contaminants, road film, and loose material.
Sanding and leveling – Using progressively finer grits, we remove the damaged layer of plastic and smooth the surface. This might start with 400-grit for heavy oxidation and work through 800, 1000, 1500, 2000, and 3000-grit for a glass-smooth finish.
Polishing – Machine polishing with automotive compound brings the clarity back to the plastic.
Professional UV coating – This is where professional restoration separates from DIY. We apply a professional-grade UV-inhibiting clear coat that bonds to the plastic and provides long-lasting protection. This coating is designed to handle years of UV exposure, road chemicals, and Wisconsin weather.
Cure time – The coating needs to cure properly. Rushing this step compromises longevity.
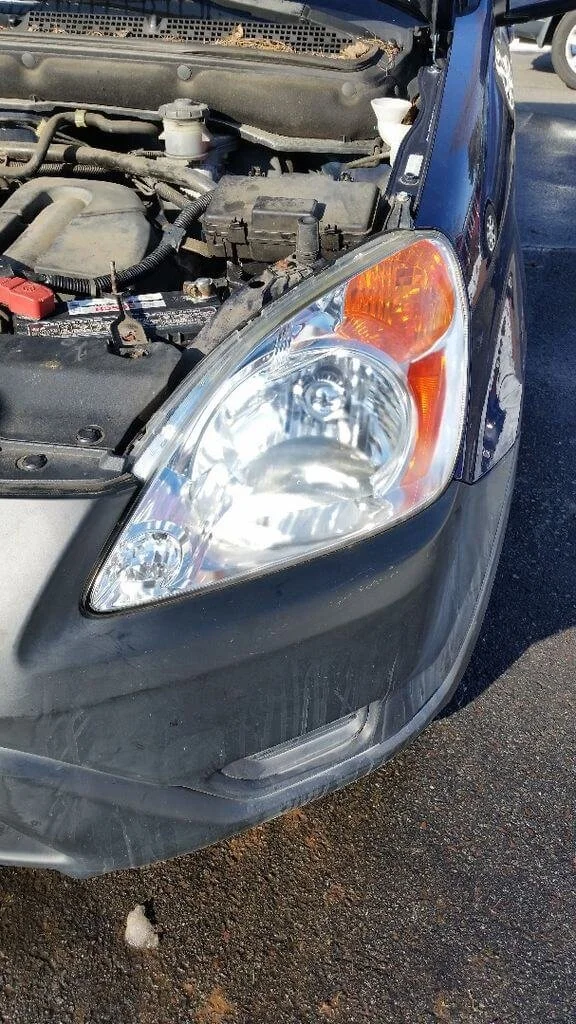
The result is headlights that look crystal clear and stay that way. Not for a couple months. For years.
For more details on our headlight restoration process and what to expect, check out our headlight restoration resource.
Headlight Restoration vs. Replacement: Which Makes Sense?
This is the cost question everyone asks.
Headlight restoration: Typically runs $75-$150 for both headlights at a professional shop. Takes about an hour. Results are excellent on headlights with surface oxidation and moderate clouding.
Headlight replacement: Can easily cost $200 to $500 per headlight for the assembly alone, plus $50 to $90 per side for installation. Modern headlight assemblies with LED or adaptive lighting? Some run $800 to $1,500 each.
For most vehicles, restoration is the obvious choice financially. You're spending a fraction of replacement cost and getting headlights that look and perform like new.
When restoration won't work:
Deep cracks or physical damage to the lens
Internal condensation from failed seals (if the seal can't be repaired)
Severely pitted lenses where the plastic is too thin from previous aggressive sanding
Headlights with internal reflector damage
If the lens itself is structurally compromised, replacement is the only option. But for the vast majority of cloudy, yellow, hazy headlights? Restoration handles it.
Beyond Headlights: Complete Nighttime Visibility
While you're addressing cloudy headlights, don't overlook other factors that affect nighttime driving safety:
Wiper blades: Even with enough light, rain or snow restricts vision when your wipers are shot. Brittle, damaged, or frozen blades add to the risk. Inspect your wiper blades regularly and replace them when performance drops. If your vehicle is stored outdoors, the rubber degrades faster from UV exposure – same as your headlights.
Washer fluid: Make sure you've got enough, that it's rated for current temperatures, and that the system actually works. Check nozzles to keep them free of debris, ice, and snow. Nothing worse than hitting a spray of road slush and realizing your washer reservoir is empty.
Tail lights and brake lights: These oxidize too, though usually slower than headlights since they face away from the road. But reduced tail light visibility is just as dangerous as reduced headlight output. Have someone check your lights while you press the brakes.
Fog lights: If your vehicle has them, make sure they're clear and functional. Foggy fog lights are basically useless.
Auto Color: Headlight Restoration in Madison WI
At Auto Color, headlight restoration is one of our most popular services – and for good reason. It's a quick, affordable repair that makes a dramatic difference in both appearance and safety.
We handle everything from minor hazing to severely oxidized lenses that barely pass light anymore. Our professional restoration process brings headlights back to crystal-clear condition and keeps them that way.
Serving drivers throughout the Madison WI area including Middleton, Waunakee, Sun Prairie, and all of Dane County:
Call Auto Color today to schedule headlight restoration. It's one of the quickest, most affordable upgrades you can make to your vehicle's safety and appearance. Takes about an hour, and you'll wonder why you waited so long.
Don't drive around Madison with foggy headlights when the fix is this simple.
Professional auto body and detailing services including headlight restoration, paint protection, and complete vehicle care. Serving the Madison WI area since 1991.